Most likely, this will not make a good impression on the potential users of our blog. So, before the visitor clicks the back button or close the window/browser's tab, thus leaving our site forever, we may want to redirect 404 error in Blogger to a page, so that the visitor will continue reading our blog.
One of the most used methods is the "meta refresh" but the problem with this method is that it breaks navigation (doesn't allow to return back). In this case, the best method is to use JavaScript about which I will go into more detail below.
Redirect Blogger 404 Error with JavaScript
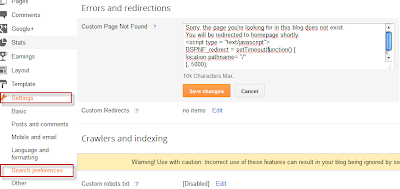
Go to your Blogger dashboard, select your blog and click the Settings menu item > Search preferences > Custom Page Not Found.Copy and paste the following code inside the empty box:
Sorry, the page you're looking for in this blog does not exist.The text which is going to be displayed can be modified as you want. If you are willing to redirect the 404 error page to another page other than home page, just replace pathname to href and / with the url of your page. Finally, the number 5000 which is the delay expressed in milliseconds, can be changed to other value if this is more convenient.
You will be redirected to homepage shortly.
<script type = "text/javascript">
PNF_redirect = setTimeout(function() {
location.pathname= "/"
}, 5000);
</script>
Next thing to do is to 'Save changes' and do a little test to check if the code works well. You can verify the 404 error page functionality by adding a random text at the end of your blog address - after pressing Enter, you should see the error page followed by a redirection after 5 seconds. That's it!


Post a Comment